개요
계층 구조를 짜두고 플로우를 보면서 최대한 책임 분리를 생각하면서 클래스 파일을 만들고, 코드를 작성했다. 책임을 분리한다는 것 때문에 특정 객체가 어떤 곳에서 호출되는지 해당 객체에서는 보이지 않았다. 이 때문에 처음 하루동안에는 코드를 작성하는데 버퍼링이 걸렸다.
그러다 방법을 찾았는데, 내가 짠 계층 구조 중 시스템 계층부터 메서드와 주석을 달아보는 것이었다. 시스템 계층은 데이터, 프레젠테이션 등 여러 계층을 한데 묶어서 연결해주는 풀(glue)의 역할을 하는 유일한 계층이었기 때문에 머리에 떠오르는 흐름과 같아 훨씬 더 빠르게 작업이 이루어졌다. 주석으로 작성한 내용을 하나하나 보면서 필요한 객체를 정의하고, 구현하는 것으로 순서를 바꾸니 놀랍게도 이전에 어려웠던 클래스의 구현도 크게 어렵지 않았다.
물론 그 방법으로 모든게 다 수월하게 풀린 것은 아니었다. 객체 간 의존성을 분리하면서도 가져와 호출할 수 있어야 했는데 이 부분이 상당히 골치 아팠다. 나는 결국 이 부분을 VContainer라는 유니티 외부 패키지를 통해서 DI를 하여 해결하였다.
원사이클 플로우, 컨트롤러 수도 코드 작성
시스템 계층의 CameraBehaviourController.cs는 카메라 액션의 각 계층들의 객체들을 입력이 들어왔을 때에 알맞은 타이밍에 호출하고 전달하는 내 패키지의 중추 역할을 하는 클래스이다. 앞서 말했던 것처럼 흐름이 보이지 않는 각 객체부터 구현을 하기 보다 이 클래스부터 주석으로 흐름을 잡아가기로 했다.
namespace CameraBehaviour.SystemLayer
{
    public class CameraBehaviourController
    {
    	private CancellationTokenSource _cancelExecuteSource;

        #region Action Flow
        private async void ExecuteActionUnits(InputContext input, ActiveBehaviourInfo info, CancellationToken token)
        {
            // 첫 번째 액션 유닛 부터 순회하며 액션 실행
            // while (current != null && current.Value != null)
            //{
                // 현재 유닛 확인
                // 유닛 검증 (설정 자체에 문제가 있는지 확인)
                //{
                    // 입력 상태 확인
                    //{
                        // 입력 알림
                        // 알맞은 전략 선택
                        // 현재 카메라 상태 복사본 가져오기

                        // 아래 계산을 통해서 input 내부의 CameraState에 결과값 저장

                        // Section(최소 동작 범위 한정자)에 맞게 변화량 조정
                        // unit.action.section?.Calibrate(input);

                        // 목표 지점 계산
                        // actionStrategy.Calculate(input, _outputViewer.Cam, 현재 상태);

                        // Area에 맞게 범위 한정
                        // unit.action.area?.Calibrate(input);

                        // 카메라 동작 및 대기

                        // 추가 동작이 있는지 확인
                        //{
                        	// 위 동작과 동일한 과정을 거쳐서 추가 동작 실행
                        //}
                    //}
                //}
                //else
                //{
                    // 설정값에 오류가 있음을 알림
                //}

                // 다음 유닛으로 이동
                // current = current.Next;
            }
        }

        private void CancelExecute()
        {
            _cancelExecuteSource?.Cancel();
        }
        #endregion
    }
}
흐름을 잡아가려면 당연히 흐름을 생각해두어야 한다. 나는 카메라 액션의 전체 플로우를 가장 잘 나타낼 수 있는 하나의 예시를 잡아서 이를 바탕으로 작업을 진행했다.
마우스 드래그 → 입력 감지 → 카메라 이동 범위 한정 → 이동 위치 계산 → 카메라 이동 → 추가 동작 없음
CameraBehaviourController.cs는 입력을 받았다고 생각하고, 입력 종류에 따라 입력 값을 변환하고, 변환된 입력값을 다시 알맞은 로직을 찾아 최종 카메라 상태 값으로 계산한 뒤 그 내용을 다시 카메라 동작을 처리하는 동작부에 전달해야 한다. 입력/출력을 어디서 어디로 주어야 하는지는 일단 중요치 않다. 일단 어떻게 연결이 되었다고 치고, 직접 처리하는 중간 부분을 수도 코드로 다음과 같이 작성을 시작했다.
namespace CameraBehaviour.SystemLayer
{
    public class CameraBehaviourController : IClickReceiver, IScrollReceiver, ITouchReceiver, IPinchReceiver, IDragReceiver
    {
        #region OnClickEvent
        public void OnEndClickLeft(Vector2 position){}
        public void OnEndClickRight(Vector2 position){}
        public void OnEndClickWheel(Vector2 position){}
        public void OnStartClickLeft(Vector2 position){}
        public void OnStartClickRight(Vector2 position){}
        public void OnStartClickWheel(Vector2 position){}
        #endregion

        #region OnScrollEvent
        public void OnScroll(float delta, Vector2 position)
        {
            if (Mathf.Abs(delta) == 0) return;

            // 프로필 - 액션 유닛 불러오기
            //var behaviourInfo = _profileManger?.GetBehaviour(typeof(MouseWheelConfig));
            //if (behaviourInfo == null) return;

            // 이전 동작 취소
            CancelExecute();
            _cancelExecuteSource = new CancellationTokenSource();

            InputContext context = new InputContext();
            context.Delta = delta;
            context.StartPosition = position;
            context.EndPosition = position;

            // 액션 유닛과 입력 정보를 바탕으로 실행 요청
            //ExecuteActionUnits(context, behaviourInfo, _cancelExecuteSource.Token);
        }
        #endregion

        #region OnTouchEvent
        public void OnStartTouch(Vector2 position){}
        public void OnEndTouch(Vector2 position){}
        #endregion

        #region OnPinchEvent
        public void OnPinch(float delta, Vector2 center){}
        #endregion

        #region OnDragEvent
        public void OnDrag(Vector2 start, Vector2 end)
        {
            if (Mathf.Approximately(Vector2.Distance(start, end), 0)) return;

            // 프로필 - 액션 유닛 불러오기
            //var behaviourInfo = _profileManger?.GetBehaviour(typeof(MouseWheelConfig));
            //if (behaviourInfo == null) return;

            // 이전 동작 취소
            CancelExecute();
            _cancelExecuteSource = new CancellationTokenSource();

            InputContext context = new InputContext();
            context.StartPosition = start;
            context.EndPosition = end;
            context.Delta = Vector2.Distance(start, end);

            // 액션 유닛과 입력 정보를 바탕으로 실행 요청
            //ExecuteActionUnits(context, behaviourInfo, _cancelExecuteSource.Token);
        }
        #endregion
    }
}
일단 각 입력에 맞게 입력 데이터를 작성해주었고, 입력 데이터를 가지고 본격적인 동작 로직으로 전달한다. 여기서 바로 계산으로 들어가기 전에 입력에 대한 검증을 한 번 거치기로 한다. 동작이 될 수 없는 입력에 대해 검증을 통해 막음으로 예기치 못한 버그를 사전에 방지하고, 불필요한 계산 로직 호출을 막을 수 있기 때문이다.
여기서 하나의 문제가 있었는데, 가상으로 프로필을 가져와 그 안에서 어찌저찌 입력 타입으로 액션 유닛(프로필에 등록한 '입력-동작-후처리'의 한 묶음 단위)을 배열로 가져왔다고 치자. 문제는 어떤 동작을 원하고 어떤 계산을 해야 하는지 지금은 알 수 없다. 나는 '전략 패턴'을 통해 이를 해결했다.
namespace CameraBehaviour.Core.Strategy.Interface
{
    public interface IActionStrategy
    {
        public IActionConfig Config { get; }

        void Calculate(InputContext context, Camera camera, CameraState currentState);
    }
}
입력 데이터를 단순히 Vector2나 float와 같은 값 데이터가 아닌 클래스 데이터(InputContext)로 둔 이유도 여기에 있다. 위와 같은 형식으로 인터페이스를 구현하면 어떤 계산을 필요로 하는지 몰라도 입력 데이터(InputContext)만 있다면 계산 작업을 실행시킬 수 있게 되었다.
namespace CameraBehaviour.DataLayer.Config.Area
{
    public abstract class AreaConfigBase : ConfigBase, IAreaConfig
    {
        public override void Validate(List<string> warnings)
        {
            base.Validate(warnings);
        }

        public abstract void Calibrate(InputContext context);
    }
}
다음으로 동작 범위를 한정지어야 하는데 범위 한정 방식도 여러개이다보니 어떤 식으로 보정(Calibrate)해야 하는지 당장은 알 수 없다. 이 역시 전략 패턴을 사용하여 해결했다. 위는 범위 한정을 행하는 베이스 코드이다.(인터페이스처럼 이를 상속받아 추상 메서드를 구현한다.) 계산된 결과 값을 뜻하는 카메라 상태 데이터(CameraState)를 매개변수로 Calibrate 메서드를 호출하는 것으로 쉽게 문제를 해결할 수 있었다.
프로필 정의
앞서 작성한 수도코드에서 가장 중요한 데이터는 프로필이다. 프로필 내 액션 유닛의 내용을 통해 입력부터 동작, 후처리까지 모든게 결정되기 때문이다. 그래서 프로필과 관련된 데이터들을 먼저 구현하기로 했다. (Data 계층: Data/Config 폴더로 구분)
프로필은 CameraActionUnit 배열을 담고 있다. 그리고 이 액션 유닛은 다음의 내용을 담게 된다.
- 입력: 입력 타입, 기준, 기타 입력 설정
- 메인 동작: 동작 타입, 연결된 로직(전략) 타입, 기타 동작 설정
- 추가 동작(후처리): 추가 동작 타입, 연결된 로직(전략) 타입, 기타 동작 설정
각 입력/동작/추가 동작은 타입에 따라 설정 값이 다를 수 있다. 그래서 일단 해당 입력/동작/추가 동작을 인터페이스로 정의하였다. 그리고 액션 유닛을 에디터에서 설정할 때에 원하는 내용을 넣을 수 있도록 [SerializeReference] 속성을 통해 필드를 각각 만들어주었다.
namespace CameraBehaviour.DataLayer.Config
{
    [Serializable]
    public class CameraActionUnit
    {
        [Header("메타 데이터")]
        [FieldLabel("액션 이름 지정")]
        public string name;         // 가독성을 위한 이름
        [FieldLabel("실행 순서")]
        public int order;           // 실행 순서(또는 우선순위)

        [Header("1) 입력 단계")]
        [SerializeReference] public InputConfigBase input;

        [Header("2) 동작 단계")]
        [SerializeReference, FieldLabel("메인 액션")] public ActionConfigBase action;

        [Header("3) 추가 동작 단계 (선택)")]
        [SerializeReference, FieldLabel("추가 액션")] public PostActionConfigBase postAction;

        public void Validate(List<string> warnings)
        {
            if (!enabled) return;

            if (input == null)
                warnings.Add($"{name} (ActionUnit): 입력 방식(Input)이 비어있습니다.");

            if (action == null)
                warnings.Add($"{name} (ActionUnit): 메인 동작(Action)이 비어있습니다.");

            input?.Validate(warnings);
            action?.Validate(warnings);
            postAction?.Validate(warnings);
        }
    }
}
여기서 [SerializeReference] 속성은 [SerailzeField]가 UnityEngine.Object 기반 타입만 저장할 수 있는 것과 다르게 인터페이스/추상 클래스를 등록할 수 있도록 해주는 속성이다. 나와 같이 전략 패턴을 사용하는데 유용한 속성이라고 할 수 있겠다.
(단, [SerializeReference]는 UnityEngine.Object가 아닌 일반 객체만 직렬화되기 때문에 ScriptableObject나 Monobehaviour에는 사용하면 안 된다.)
[SerializeReference] 속성을 사용하면서 에디터에서 해당 필드에 값을 넣기 위해 에디터 클래스로 인스펙터를 이쁘게 구성할 필요가 생겼다. CameraBehaviouProfileEditor.cs는 액션 유닛을 추가하고, 그 내부에 [SerializeReference] 필드를 드랍다운으로 선택할 수 있게 하고, 그에 따라 알맞은 속성이 나오도록 GUI를 구성했다. 에디터 클래스 내용이 생각보다 길어져 따로 코드는 올리지 않겠다.
앞서 생각해둔 예시 플로우를 위해 카메라 이동 동작에 대해 클래스를 만들고, 추상 메서드를 구현했다.
namespace CameraBehaviour.Core.Strategy.Action
{
    public class CameraMoveStrategy : IActionStrategy
    {
        protected MoveActionConfig Config;
        IActionConfig IActionStrategy.Config => Config;

        public CameraMoveStrategy(MoveActionConfig config)
        {
            Config = config;
        }

        public virtual void Calculate(InputContext context, Camera camera, CameraState currentState)
        {
            // 화면 시작점과 끝점을 월드 좌표로 변환
            float distance = Mathf.Abs(camera.transform.position.z - 0f);
            Vector3 worldStartPos = camera.ScreenToWorldPoint(new Vector3(context.StartPosition.x, context.StartPosition.y, distance));
            Vector3 worldEndPos = camera.ScreenToWorldPoint(new Vector3(context.EndPosition.x, context.EndPosition.y, distance));

            // 월드 변위 계산
            Vector3 displacement = worldEndPos - worldStartPos; // 변위 벡터
            if (Config.reversedDirection) displacement *= -1f;
            if (!Config.MovableX) displacement.x = 0;
            if (!Config.MovableY) displacement.y = 0;

            // 월드 변위를 적용하여 목표 지점을 계산
            // (참고: 일반적으로 카메라 이동(패닝)은 입력 방향과 반대로 움직임
            Vector3 targetPos = currentState.Position - displacement * Config.MoveMultiplier;   // 목표 지점(범위 제한 전)

            // 이전 정보와 목표 정보 저장
            context.PreviousState = currentState;       // 원래 위치 저장
            context.RequestState = currentState;        // 위치값 외에 다른 값은 동일하게 유지
            context.RequestState.Position = targetPos;  // 위치만 타겟 지점으로 설정
        }
    }
}
실제로 에디터에서는 다음과 같이 표시되는 것을 볼 수 있었다.

프로필 매니저
프로필을 만들었으니 프로필을 등록하는 프로필 매니저가 필요하다. 프로필 매니저는 프로필이 특정 이유로 바뀔 때마다(씬 전환 등) 해당하는 프로필로 변경하는 역할을 한다. 현재는 씬 전환 시에만 프로필이 변경된다.
프로필 매니저가 해야 하는 역할(책임)은 크게 3가지이다.
- 프로필 등록: 프로필을 등록하고, 입력 타입에 맞게 각 유닛 리스트를 priority 순으로 정렬하여 저장
- 프로필 제거: 프로필을 제거하고, 관련된 액션 유닛도 모두 제거
- 입력에 맞는 액션 유닛 리스트 반환: 입력 형식을 매개변수로 받으면, 해당 입력 형식에 맞는 액션 유닛 리스트를 반환
실행 단계에서 CameraBehaviourController는 이 리스트를 순서대로 실행만 하기 때문에 나는 이 액션들을 링크드리스트로 저장했다. 등록할 때에만 항목을 수정하고, 제거 시에는 중간 항목 수정 없이 Clear 시키기 때문에 가장 효율적이라고 생각했다. 아래는 관련한 코드 내용으로 현재는 프로필 등록 시 제거도 같이 일어나고 있어 등록과 제거를 구분하지 않고 하나의 메서드로 두었다.
namespace CameraBehaviour.SystemLayer
{
    public class ActiveBehaviourInfo
    {
        public LinkedList<CameraActionUnit> SortedActionUnits { get; private set; } = new();
    }

    public class CameraProfileManager
    {
        private CameraBehaviourProfile _activeProfile = null;
        private Dictionary<Type, ActiveBehaviourInfo> _activeUnits = new();

        public event Action OnChangedProfile;

        public void SetBehaviourProfile(CameraBehaviourProfile profile)
        {
            if (profile == null) return;
            // 이전 프로필에 관한 액션 유닛들을 모두 제거
            _activeUnits.Clear();
            _callingActionUnits.Clear();

            // 프로필 변경
            _activeProfile = profile;

            // 새로운 프로필의 액션 유닛을 돌면서 타입 별로 링크드 리스트에 삽입
            // ActionUnit.order 순(작은 값이 먼저) > 등록 순 으로 순서를 배치
            if (_activeProfile.actions != null)
            {
                foreach (var unit in _activeProfile.actions)
                {
                    if (unit == null || !unit.enabled || unit.input == null) continue;
                    ActiveBehaviourInfo behaviourInfo = null;
                    if (unit.input is CallDirectConfig callingConfig)
                    {
                        if (!_callingActionUnits.TryGetValue(callingConfig.callingName, out behaviourInfo))
                        {
                            behaviourInfo = new ActiveBehaviourInfo();
                            _callingActionUnits[callingConfig.callingName] = behaviourInfo;
                        }
                    }
                    else
                    {
                        var inputType = unit.input.GetType();
                        if (!_activeUnits.TryGetValue(inputType, out behaviourInfo))
                        {
                            behaviourInfo = new ActiveBehaviourInfo();
                            _activeUnits[inputType] = behaviourInfo;
                        }
                    }

                    var sortedActionUnits = behaviourInfo.SortedActionUnits;

                    var currentNode = sortedActionUnits.First;
                    while (currentNode != null && currentNode.Value.order <= unit.order)
                    {
                        currentNode = currentNode.Next;
                    }

                    if (currentNode != null)
                    {
                        sortedActionUnits.AddBefore(currentNode, unit);
                    }
                    else
                    {
                        sortedActionUnits.AddLast(unit);
                    }
                }
            }

            // 디버거에 디버깅 가능 여부 세팅
            DebugVisualizer.CanLogging = profile.debugLogging;

            // 동작 시 캔슬 등의 처리를 위해 연결된 이벤트 호출
            OnChangedProfile?.Invoke();
        }
    }
}
액션 유닛을 가져오는 메서드는 훨씬 더 간단하다. 등록 시에 순서를 보장하여 잘 저장해두었기 때문에 딕셔너리에서 이를 찾아 넘겨주기만 하면 된다.
namespace CameraBehaviour.SystemLayer
{
    public class CameraProfileManager
    {
        private Dictionary<Type, ActiveBehaviourInfo> _activeUnits = new();

        // 입력 타입으로 액션 유닛 리스트 가져오기
        public ActiveBehaviourInfo GetBehaviour(Type inputType)
        {
            if (!typeof(InputConfigBase).IsAssignableFrom(inputType))
                throw new ArgumentException("Must inherit from InputConfigBase");
            if (_activeUnits.TryGetValue(inputType, out var info))
            {
                if (info == null || info.SortedActionUnits.Count == 0) return null;
                return info;
            }
            return null;
        }
    }
}
입력 / 동작 / 범위 한정 로직 구현
Core 계층에 있는 객체들을 구현하는 단계이다. 개요에서 얘기했던 어려웠던 부분이 이 객체들에 대한 구현인데, 흐름을 타고 차례차례 오다보니 어떤 것을 구현해야 하는지 명확해졌다. 그 답은 앞서 입력과 동작에 대한 인터페이스/공통 부모 클래스에 있었다.
namespace CameraBehaviour.DataLayer.Config.Input
{
    public abstract class InputConfigBase : ConfigBase, IInputConfig
    {
        [Header("인식 범위 설정")]
        [FieldLabel("최소 변화량")]
        [Tooltip("인식하여 동작으로 연결할 최소 입력 변화량을 설정합니다. 이보다 작은 변화량은 무시됩니다.")]
        [Min(0)] public float minDelta = 0f;
        public float MinDelta => minDelta;

        public override void Validate(List<string> warnings)
        {
            base.Validate(warnings);
            if (minDelta < 0f)
                warnings.Add($"{DisplayName} ({GetType().Name}): 최소 변화량(MinDelta)는 0 이상이어야 합니다.");
        }

        public virtual bool ValidateInput(InputContext context)
        {
            if (context.Delta < minDelta) return false;
            return true;
        }
    }
}
namespace CameraBehaviour.Core.Strategy.Interface
{
public interface IActionStrategy
{
public IActionConfig Config { get; }
void Calculate(InputContext context, Camera camera, CameraState currentState);
}
}
모든 입력/동작/범위 한정 로직은 위의 인터페이스의 추상메서드를 통해 호출된다. 고로 특정 입력/동작/범위에 대한 새로운 타입이 생길 때마다 나는 이 추상 클래스만 구현하면 되는 것이다. 처음에 언급한 예시 플로우를 기준으로 아래에 입력/동작/범위 한정에 대한 각각 객체 하나씩을 구현하였다.
namespace CameraBehaviour.Core.Strategy.Action
{
    public class CameraMoveStrategy : IActionStrategy
    {
        protected MoveActionConfig Config;
        IActionConfig IActionStrategy.Config => Config;

        public CameraMoveStrategy(MoveActionConfig config)
        {
            Config = config;
        }

        public virtual void Calculate(InputContext context, Camera camera, CameraState currentState)
        {
            // 화면 시작점과 끝점을 월드 좌표로 변환
            float distance = Mathf.Abs(camera.transform.position.z - 0f);
            Vector3 worldStartPos = camera.ScreenToWorldPoint(new Vector3(context.StartPosition.x, context.StartPosition.y, distance));
            Vector3 worldEndPos = camera.ScreenToWorldPoint(new Vector3(context.EndPosition.x, context.EndPosition.y, distance));

            // 월드 변위 계산
            Vector3 displacement = worldEndPos - worldStartPos; // 변위 벡터
            if (Config.reversedDirection) displacement *= -1f;
            if (!Config.MovableX) displacement.x = 0;
            if (!Config.MovableY) displacement.y = 0;

            // 월드 변위를 적용하여 목표 지점을 계산
            // (참고: 일반적으로 카메라 이동(패닝)은 입력 방향과 반대로 움직임
            Vector3 targetPos = currentState.Position - displacement * Config.MoveMultiplier;   // 목표 지점(범위 제한 전)

            // 이전 정보와 목표 정보 저장
            context.PreviousState = currentState;       // 원래 위치 저장
            context.RequestState = currentState;        // 위치값 외에 다른 값은 동일하게 유지
            context.RequestState.Position = targetPos;  // 위치만 타겟 지점으로 설정
        }
    }
}
namespace CameraBehaviour.DataLayer.Config.Area
{
public class FixedSizeArea : AreaConfigBase
{
[Header("카메라 범위 설정")]
[FieldLabel("중심점")]
[SerializeField] Vector2 center;
[FieldLabel("사이즈")]
[SerializeField] Vector2 size;
[Header("적용 범위")]
[FieldLabel("중심 좌표만 체크")]
[Tooltip("체크 시에는 카메라 중앙 지점만 확인합니다. 체크하지 않은 경우 카메라 범위 전체에 대해 체크합니다.")]
[SerializeField] bool checkOnlyCenter;
public override void Calibrate(InputContext context)
{
if (checkOnlyCenter) CalibrateOnlyCenter(context);
else CalibrateCameraRange(context);
}
private void CalibrateOnlyCenter(InputContext context)
{
var min = center - size / 2;
var max = center + size / 2;
CalibratePosition(context, min, max);
}
private void CalibrateCameraRange(InputContext context)
{
// 1. 카메라 줌 상태에 따라 유효 범위를 계산합니다.
float camHeight = context.RequestState.OrthographicSize * 2f;
float camWidth = camHeight * ((float)Screen.width / Screen.height);
Vector2 effectiveSize = new Vector2(
Mathf.Max(0, this.size.x - camWidth),
Mathf.Max(0, this.size.y - camHeight)
);
var min = this.center - effectiveSize / 2;
var max = this.center + effectiveSize / 2;
// 2. 공통 보정 로직을 호출합니다.
CalibratePosition(context, min, max);
}
private void CalibratePosition(InputContext context, Vector2 min, Vector2 max)
{
Vector2 startPosition = context.PreviousState.Position;
Vector2 targetPosition = context.RequestState.Position;
// 이미 범위 안이라면 리턴합니다.
if (targetPosition.x >= min.x && targetPosition.x <= max.x &&
targetPosition.y >= min.y && targetPosition.y <= max.y)
{
return;
}
var displacement = targetPosition - startPosition;
// 만약 이전 위치도 범위 밖이라면, 새로운 범위로 clamp 합니다.
if (startPosition.x < min.x || startPosition.x > max.x ||
startPosition.y < min.y || startPosition.y > max.y)
{
context.RequestState.Position = new Vector2(
Mathf.Clamp(targetPosition.x, min.x, max.x),
Mathf.Clamp(targetPosition.y, min.y, max.y)
);
return;
}
// 이동이 없다면, clamp 합니다.
if (displacement == Vector2.zero)
{
context.RequestState.Position = new Vector2(
Mathf.Clamp(targetPosition.x, min.x, max.x),
Mathf.Clamp(targetPosition.y, min.y, max.y)
);
return;
}
// Ray-AABB 교차 테스트
Vector2 invDir = new Vector2(1f / displacement.x, 1f / displacement.y);
Vector2 tNear = (min - startPosition) * invDir;
Vector2 tFar = (max - startPosition) * invDir;
if (invDir.x < 0) { var temp = tNear.x; tNear.x = tFar.x; tFar.x = temp; }
if (invDir.y < 0) { var temp = tNear.y; tNear.y = tFar.y; tFar.y = temp; }
float tEnter = Mathf.Max(tNear.x, tNear.y);
float tExit = Mathf.Min(tFar.x, tFar.y);
if (tEnter < tExit && tEnter > 0f && tEnter < 1f)
{
context.RequestState.Position = startPosition + displacement * tEnter;
}
else
{
context.RequestState.Position = new Vector2(
Mathf.Clamp(targetPosition.x, min.x, max.x),
Mathf.Clamp(targetPosition.y, min.y, max.y)
);
}
}
}
}
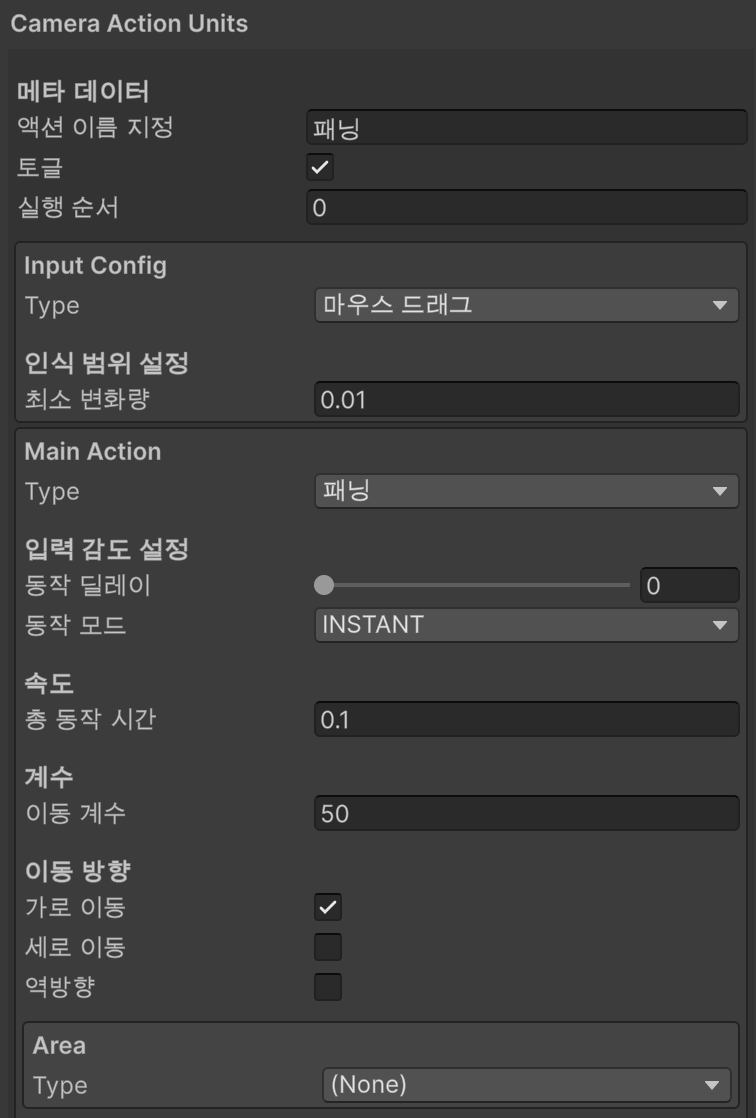
실제로 에디터에서 프로필을 확인하면, 내가 구현한 타입들이 드롭다운으로 뜨고, 선택 시에 알맞은 필드가 보이는 것을 볼 수 있다.

추가 동작 역시 동작과 마찬가지로 구현하면 된다. 여기서는 따로 구현하지 않았는데, 동작과의 구분을 위해 클래스 타입을 나눠둔 것 뿐, 로직은 거의 동일하기 때문에 따로 구현 내용을 언급하지는 않겠다.
카메라 뷰어 구현
모든 동작에 대한 계산이 끝나면 관련 설정(ActionConfig)와 계산의 결과값(CameraState)을 뷰어에 보내게 된다. 뷰어는 이 데이터를 해석해서 카메라의 모든 동작을 실행한다. 설정 값을 같이 보내는 것은 계산이 아니라 실제 카메라의 동작에서 처리되어야 하는 설정이 있을 수 있기 때문이다.
namespace CameraBehaviour.PresentationLayer.Output
{
    [RequireComponent(typeof(Camera))]
    public class CameraOutputViewer : MonoBehaviour
    {
        private Camera _targetCamera;
        public Camera Cam => _targetCamera;
        private CameraState _currentState;
        public CameraState CurrentState => _currentState;
        public bool DuringAction = false;

        private static int MAXDELAYMILLISECONDS = 10000;

        #region Camera Actions
        public async Task<bool> RequestAction(ActionConfigBase config, InputContext context, CancellationToken token = default)
        {
            try
            {
                // 동작 전 딜레이 대기
                if (config.actionDelay > 0)
                {
                    int delay = Mathf.Clamp(config.actionDelay, 0, MAXDELAYMILLISECONDS);
                    await Task.Delay(delay, token);
                }

                // 동작 시간
                float duration = config.duration;

                // 카메라 이동
                if (config is MoveActionConfig moveInfo)
                {
                    Vector3? targetPos = context?.RequestState?.Position ?? null;
                    if (targetPos == null) return false;
                    if (moveInfo.ActionMode == ActionMode.INSTANT)
                    {
                        if (Mathf.Approximately(duration, 0f))
                            MoveCameraDirect(targetPos.Value);
                        else
                            await this.RunCoroutine(MoveCamera(targetPos.Value, duration), token);
                    }
                    else if (moveInfo.ActionMode == ActionMode.SMOOTH)
                        await this.RunCoroutine(MoveCameraSmooth(targetPos.Value, duration), token);
                }
                // 카메라 줌
                else if (config is ZoomActionConfig zoomInfo)
                {
                    float? size = context?.RequestState?.OrthographicSize ?? null;
                    if (size == null) return false;
                    if (zoomInfo.ActionMode == ActionMode.INSTANT)
                    {
                        if (Mathf.Approximately(duration, 0))
                            SetOrthographicSizeDirect(size.Value);
                        else
                            await this.RunCoroutine(SetOrthographicSize(size.Value, duration), token);
                    }
                    else if (zoomInfo.ActionMode == ActionMode.SMOOTH)
                        await this.RunCoroutine(SetOrthographicSizeSmooth(size.Value, duration), token);
                }
            }
            catch (System.OperationCanceledException)
            {
                // 작업 취소는 드래그/스크롤 시 발생하는 정상적인 동작이므로,
                // 예외를 여기서 잡아서 콘솔에 에러 로그가 표시되지 않도록 합니다.
                return false;
            }
            return true;
        }
    }
}
사실 이 부분도 모든 동작을 OutputViewer에 명시하고 조건문으로 호출하기 보다는 각 동작에 대한 구현을 다시 별도의 클래스로 나누어서 전략 패턴으로 처리하는 것이 맞다고 생각한다. 이후에 그렇게 수정할 예정이다.
카메라의 동작에 대한 내용은 일단 이동, 줌에 대해서만 구현해두었다. 이동, 줌 동작에 대해 일반 모드, 즉각 모드, 스무스 모드 세 가지 메서드를 구현했다.
public IEnumerator MoveCamera(Vector2 pos, float duration)
{
    if (_targetCamera == null) yield break;
    if (Mathf.Approximately(duration, 0))
    {
        MoveCameraDirect(pos);
        yield break;
    }

    DuringAction = true;
    Vector3 startPosition = _targetCamera.transform.position;
    Vector3 targetPosition = new Vector3(pos.x, pos.y, startPosition.z);
    float elapsedTime = 0f;

    while (elapsedTime < duration)
    {
        elapsedTime += Time.deltaTime;
        float t = elapsedTime / duration;
        Vector3 newPos = Vector3.Lerp(startPosition, targetPosition, t);
        _targetCamera.transform.position = newPos;
        yield return null;
    }

    _targetCamera.transform.position = targetPosition;
    DuringAction = false;
}

public IEnumerator MoveCameraSmooth(Vector2 pos, float duration)
{
    if (_targetCamera == null) yield break;
    if (Mathf.Approximately(duration, 0))
    {
        MoveCameraDirect(pos);
        yield break;
    }

    DuringAction = true;
    Vector3 startPosition = _targetCamera.transform.position;
    Vector3 targetPosition = new Vector3(pos.x, pos.y, startPosition.z);
    float elapsedTime = 0f;

    while (elapsedTime < duration)
    {
        elapsedTime += Time.deltaTime;
        float t = elapsedTime / duration;
        t = Mathf.SmoothStep(0, 1, t);
        Vector3 newPos = Vector3.Lerp(startPosition, targetPosition, t);
        _targetCamera.transform.position = newPos;
        yield return null;
    }

    _targetCamera.transform.position = targetPosition;
    DuringAction = false;
}

public void MoveCameraDirect(Vector2 pos)
{
    if (_targetCamera == null) return;
    _targetCamera.transform.position = new Vector3(pos.x, pos.y, _targetCamera.transform.position.z);
}
입력 감지기 구현
입력은 환경에 따라 여러가지 종류가 있을 수 있다. 마우스 클릭, 휠, 드래그, 터치 스크린 입력, 핀치 등 다양하다. 그래서 입력 장치 별로 두 가지 클래스(감지기)를 따로 구현했다.
먼저 아래는 마우스에 대한 입력을 감지하는 클래스이다. 현재는 마우스의 좌클릭 및 드래그, 휠 스크롤을 감지하는 로직을 구현하였다.
namespace CameraBehaviour.PresentationLayer.Inputs
{
    public class MouseInputAdapter : MonoBehaviour
    {
    	// 입력을 받아 처리할 객체들 (등록 필요)
        private IClickReceiver _clickReceiver;
        private IDragReceiver _dragReceiver;
        private IScrollReceiver _scrollReceiver;

		// 상태
        private bool _isDragging;
        private Vector2 _dragStartPosition;
        private Vector2 _lastMousePosition;
        private const float DRAG_THRESHOLD_SQR = 25f;

        private void Update()
        {
            HandleScrollInput();
            HandleMouseClickAndDrag();
        }

        private void HandleScrollInput()
        {
            float scrollInput = Input.mouseScrollDelta.y;
            if (Mathf.Abs(scrollInput) > 0f)
            {
                _scrollReceiver?.OnScroll(scrollInput, Input.mousePosition);
            }
        }

        private void HandleMouseClickAndDrag()
        {
            if (Input.GetMouseButtonDown(0))
            {
                _isDragging = false;
                _dragStartPosition = Input.mousePosition;
                _lastMousePosition = _dragStartPosition; // Initialize last position
                _clickReceiver?.OnStartClickLeft(_dragStartPosition);
            }

            if (Input.GetMouseButton(0))
            {
                Vector2 currentMousePosition = Input.mousePosition;
                // Check if it turned into a drag if it wasn't already
                if (!_isDragging && (currentMousePosition - _dragStartPosition).sqrMagnitude > DRAG_THRESHOLD_SQR)
                {
                    _isDragging = true;
                }

                if (_isDragging)
                {
                    _dragReceiver?.OnDrag(_lastMousePosition, currentMousePosition);
                }
                _lastMousePosition = currentMousePosition; // Update last position for the next frame
            }

            if (Input.GetMouseButtonUp(0))
            {
                _clickReceiver?.OnEndClickLeft(Input.mousePosition);
                _isDragging = false;
            }
        }
    }
}
다음으로는 터치 스크린에 대한 입력을 감지하는 클래스를 구현했다. 여기에는 단일 터치, 중복 터치를 감지하여 터치, 핀치, 드래그를 감지할 수 있도록 하였다.
namespace CameraBehaviour.PresentationLayer.Inputs
{
    public class TouchInputAdapter : MonoBehaviour
    {
    	// 입력을 받아 처리할 객체들(등록 필요)
        private ITouchReceiver _touchReceiver;
        private IDragReceiver _dragReceiver;
        private IPinchReceiver _pinchReceiver;

        // 계산용 변수
        private const float DRAG_THRESHOLD_SQR = 49f;
        private const float PINCH_DEBOUNCE_TIME = 0.1f;

        // 상태
        private bool _isDragging;
        private Vector2 _startPosition;
        private Vector2 _lastTouchPosition;

        // 핀치 관련 변수
        private Coroutine _pinchDebounceCoroutine;
        private float _accumulatedPinchDelta;

        private void Update()
        {
            if (Input.touchCount >= 2)
            {
                HandleMultiTouch();
            }
            else if (Input.touchCount == 1)
            {
                HandleSingleTouch();
            }
            else
            {
                _isDragging = false;
            }
        }

        private void HandleSingleTouch()
        {
            Touch touch = Input.GetTouch(0);

            switch (touch.phase)
            {
                case TouchPhase.Began:
                    _isDragging = false;
                    _startPosition = touch.position;
                    _lastTouchPosition = _startPosition;
                    _touchReceiver?.OnStartTouch(touch.position);
                    break;

                case TouchPhase.Moved:
                    if (!_isDragging && (touch.position - _startPosition).sqrMagnitude > DRAG_THRESHOLD_SQR)
                    {
                        _isDragging = true;
                    }

                    if (_isDragging)
                    {
                        _dragReceiver?.OnDrag(_lastTouchPosition, touch.position);
                    }
                    _lastTouchPosition = touch.position
                    break;

                case TouchPhase.Ended:
                    _touchReceiver?.OnEndTouch(touch.position);
                    _isDragging = false;
                    break;

                case TouchPhase.Canceled:
                    _isDragging = false;
                    break;
            }
        }

        private void HandleMultiTouch()
        {
            Touch touch1 = Input.GetTouch(0);
            Touch touch2 = Input.GetTouch(1);

            if (touch1.phase == TouchPhase.Began || touch2.phase == TouchPhase.Began)
            {
                _isDragging = false;
                _accumulatedPinchDelta = 0;
                return;
            }

            if (touch1.phase == TouchPhase.Moved || touch2.phase == TouchPhase.Moved)
            {
                Vector2 touch1PrevPos = touch1.position - touch1.deltaPosition;
                Vector2 touch2PrevPos = touch2.position - touch2.deltaPosition;

                float prevDistance = (touch1PrevPos - touch2PrevPos).magnitude;
                float currentDistance = (touch1.position - touch2.position).magnitude;

                float deltaDistance = currentDistance - prevDistance;
                _accumulatedPinchDelta += deltaDistance;

                if (_pinchDebounceCoroutine != null)
                {
                    StopCoroutine(_pinchDebounceCoroutine);
                }
                _pinchDebounceCoroutine = StartCoroutine(PinchDebounceCoroutine());
            }
        }

        private IEnumerator PinchDebounceCoroutine()
        {
            yield return new WaitForSeconds(PINCH_DEBOUNCE_TIME);
            if (Input.touchCount >= 2)
            {
                Vector2 center = (Input.GetTouch(0).position + Input.GetTouch(1).position) / 2;
                _pinchReceiver?.OnPinch(_accumulatedPinchDelta, center);
            }

            _accumulatedPinchDelta = 0f;
            _pinchDebounceCoroutine = null;
        }
    }
}
여기서 중요한 것은 입력 발생 시 내용을 직접 Controller로 전달하지 않았다는 점이다. 나는 각 Receiver 인터페이스 객체들을 이벤트로 연결하는 방식으로 처리하였다. 이후에 카메라 액션 말고 다른 컨트롤러가 이 입력을 감지하여 처리해야 할 수도 있고, 특정 입력만 선택적으로 처리할 수도 있는데 필요한 인터페이스를 상속 받고, Adapter에 등록/해제하는 것으로 이것이 가능해지기 때문이다.
namespace CameraBehaviour.PresentationLayer.Inputs
{
    public class MouseInputAdapter : MonoBehaviour
    {
        private IClickReceiver _clickReceiver;
        private IDragReceiver _dragReceiver;
        private IScrollReceiver _scrollReceiver;

        [Inject]
        public void Construct(
            IClickReceiver clickReceiver,
            IScrollReceiver scrollReceiver,
            IDragReceiver dragReceiver
        )
        {
            _clickReceiver = clickReceiver;
            _scrollReceiver = scrollReceiver;
            _dragReceiver = dragReceiver;
        }

        private void HandleMouseClickAndDrag()
        {
            ...
            if (Input.GetMouseButtonUp(0))
            {
                _clickReceiver?.OnEndClickLeft(Input.mousePosition);
                _isDragging = false;
            }
        }
    }
}
DI 그리고, VContainer 패키지 사용
이제 모든 부품 준비는 끝났다. 연결만 하면 되는데 부품들을 연결하는 과정에서 직접 생성하거나 의존하게 되었을 때에 결합도가 상승하게 되는 문제가 있었다. 이렇게 되면 기껏 책임에 따라 독립적으로 구현한 의미가 없게 된다.
그래서 DI(Dependency Injection)을 활용하여 연결을 하고자 했다. 이를 위해서는 결국 외부에서 이 객체 인스턴스를 주입시켜야 하는데 이를 위한 좋은 패키지 하나를 찾게 되었다. 그것이 VContainer이다.
https://github.com/hadashiA/VContainer
GitHub - hadashiA/VContainer: The extra fast, minimum code size, GC-free DI (Dependency Injection) library running on Unity Game
The extra fast, minimum code size, GC-free DI (Dependency Injection) library running on Unity Game Engine. - hadashiA/VContainer
github.com
VContainer는 종속성 및 개체 생성을 쉽게 관리할 수 있도록 도와주는 프레임워크로 신기하게도 컴파일 타임에 코드를 생성한다. 아래는 LifetimeScope를 생성해서 중추 역할을 하는 컨트롤러와 프로필 매니저를 해당 스코프에 등록하는 코드이다.
namespace CameraBehaviour.Infrastructure.DI
{
    public class CameraBehaviourGameLifetimeScope : LifetimeScope
    {
        protected override void Configure(IContainerBuilder builder)
        {
            // 프로필 매니저 등록
            builder.Register<CameraProfileManager>(Lifetime.Singleton);

            // CameraBehaviourController이자 I...Receiver로 등록
            builder.Register<CameraBehaviourController>(Lifetime.Singleton)
                .AsSelf()
                .AsImplementedInterfaces();
        }
    }
}
씬 구분 없이 계속 사용할 객체들은 위와 같이 GameLifetimeScope.cs에 등록하였다. 특히 컨트롤러, 프로필 매니저는 하나만 존재해야 하므로 싱글톤으로 등록하였다. AsSelf와 AsImplementedInterfaces는 CameraBehaviourController를 자기 자신의 타입 및 인터페이스 타입으로 구독하는 것을 뜻한다. CameraBehaviourController가 앞서 구현한 Receiver 인터페이스를 상속 받을 것이기 때문이다.
씬에서는 카메라 뷰어, 프로필, 입력 감지기가 변경된다. 그렇기에 SceneScope에서는 다음과 같이 해당하는 객체를 미리 [SerializeField]로 받아서 인스턴스로 등록했다.
namespace CameraBehaviour.Infrastructure.DI
{
    public class CameraBehaviourSceneLifetimeScope : LifetimeScope
    {
        [Header("프로필 설정")]
        [FieldLabel("씬 액션 프로필")]
        [SerializeField] CameraBehaviourProfile _profile;

        [Header("컴포넌트 등록")]
        [FieldLabel("카메라 동작기")]
        [SerializeField] CameraOutputViewer _cameraViewer;
        [FieldLabel("마우스 입력 감지기")]
        [SerializeField] MouseInputAdapter _mouseInput;
        [FieldLabel("터치스크린 입력 감지기")]
        [SerializeField] TouchInputAdapter _touchInput;

        protected override void Configure(IContainerBuilder builder)
        {
            builder.RegisterInstance(_profile);
            builder.RegisterInstance(_cameraViewer);
            builder.RegisterInstance(_mouseInput);
            builder.RegisterInstance(_touchInput);
        }
    }
}
실제로 각 Scope에서 등록한 객체를 주입 받고 싶은 경우 주입 받을 클래스에서 다음과 같은 내용을 작성하면 된다. 먼저 Monobehaivour의 경우에는 아래의 두 가지 방법 중 하나를 사용하면 된다.
[Inject] private CameraBehaviourController _controller;private CameraBehaviourController _controller;
[Inject]
public void Construct(
CameraBehaviourController controller)
)
{
_controller = controller;
}
그 외 클래스는 생성자를 통해 주입 받을 수 있다. (위와 동일하게 [Inject] 속성을 통해서도 주입 받을 수 있다. 둘 중 하나만 선택하면 된다.)
// https://vcontainer.hadashikick.jp 참고
public class ActorPresenter
{
    readonly CharacterService service;
    readonly ActorsView actorsView;

    public ActorPresenter(
        CharacterService service,
        ActorsView actorsView)
    {
        this.service = service;
        this.actorsView = actorsView;
    }
}
그리고, 실제로 최초 씬에 GameLifetimeScope를 컴포넌트로 추가하고, (DontDestroyObject여야 한다.) 각 씬에 SceneLifetimeScope 컴포넌트를 등록한 다음 아래 사진처럼 GameLifetimeScope를 부모로 등록해주면 된다. 이렇게 되면, 자식 컨테이너의 객체들은 부모 컨테이너의 객체를 주입 받을 수 있다.


그런데 반대로 Parent 컨테이너는 내 객체는 자식 컨테이너의 객체가 등록될 때에 Inject가 호출되지 않는다. 이는 계층형 DI 컨테이너(Hierarchical Dependency Injection)의 계층 구조 설계 철학과 수명(Scope) 관리 원칙 때문이다. 부모 컨테이너는 자식 컨테이너보다 먼저 만들어지고, 이 시점에 자식 컨테이너가 어떤 인스턴스를 등록할지 부모가 전혀 알 수 없기 때문이다. 즉, 앞서서 VContainer가 컴파일 타임에 객체를 등록/주입하기 때문에 일어나는 어쩔 수 없는 문제이다.
그렇다면 어떻게 씬 변경 시마다 컨트롤러와 프로필 매니저가 해당하는 데이터를 받을 수 있을까? 나는 이 내용을 전달하는 전달자(Bridge)를 만들어 해결했다. 아래는 프로필을 등록시켜주는 브릿지 역할을 하는 클래스다.
namespace CameraBehaviour.Infrastructure.DI
{
    public class CameraProfileRegister : IStartable
    {
        [Inject] CameraProfileManager _manager;
        [Inject] CameraBehaviourController _controller;
        [Inject] CameraBehaviourProfile _profile;

        public void Start()
        {
            _controller?.SetProfileManager(_manager);
            _manager?.SetBehaviourProfile(_profile);
        }
    }
}
이 클래스 객체들을 IStartable을 상속 받게 한 뒤에 SceneScope에서 EntryPoint로 등록하게 되면 유니티 생명주기와 비슷하게 Start() 메서드를 호출할 수 있게 된다. 이를 통해 씬에 등록된 데이터를 상위 컨테이너 객체들에게 성공적으로 넘겨줄 수 있게 되었다.
namespace CameraBehaviour.Infrastructure.DI
{
    public class CameraBehaviourSceneLifetimeScope : LifetimeScope
    {
    	...
        protected override void Configure(IContainerBuilder builder)
        {
            ...
            // 프로필, 뷰어, 입력 감지기 등록용 브릿지 클래스
            builder.RegisterEntryPoint<CameraAdapterRegister>(Lifetime.Scoped);
            builder.RegisterEntryPoint<CameraViewerRegister>(Lifetime.Scoped);
            builder.RegisterEntryPoint<CameraProfileRegister>(Lifetime.Scoped);
        }
    }
}
결과
앞서서 얘기한 플로우(마우스 드래그 시 카메라 이동)에 대한 구현을 완료했다. 실제로 에디터에서 설정을 변경하면 그에 따라 조금씩 다르게 실행된다.
드래그 - 카메라 이동 예시
예시01
설정 내용

예시 02
설정 내용

예시 03
설정 내용
추가로 줌 동작도 구현하였다. 계층 별로 독립적으로 구조를 짜둔 덕분에 줌 관련한 스크립트만 추가/수정 하는 것으로 마음껏 타입을 늘릴 수 있었다. 만약 계층 구분 없이 컨트롤러에 조건문으로 해당 로직을 넣어두었다면 불가능 했을 일이었다.
휠 스크롤 - 줌 인아웃 예시

앞으로 조금 더 다양한 동작들을 추가하고, 카메라 동작 부분도 역할 분리를 하면서 개발을 마무리할 예정이다. 코드 수정이 모두 완료된 이후에는 유니티 패키지 구조로 폴더 계층을 정리해서 실제 깃허브 레포지토리로 올리고, 링크를 걸어두도록 하겠다.
'C# > Unity' 카테고리의 다른 글
| [2D 카메라 액션 패키지 개발] #02 - 모듈화 기준, 설정 계층 정의 (0) | 2025.11.04 |
|---|---|
| [2D 카메라 액션 패키지 개발] #01 - 기능 정의 및 플로우 차트 작성 (0) | 2025.11.03 |